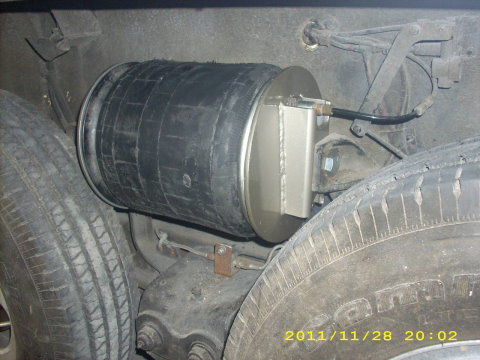
SULLYBILT REPLACEMENT AIR SPRING
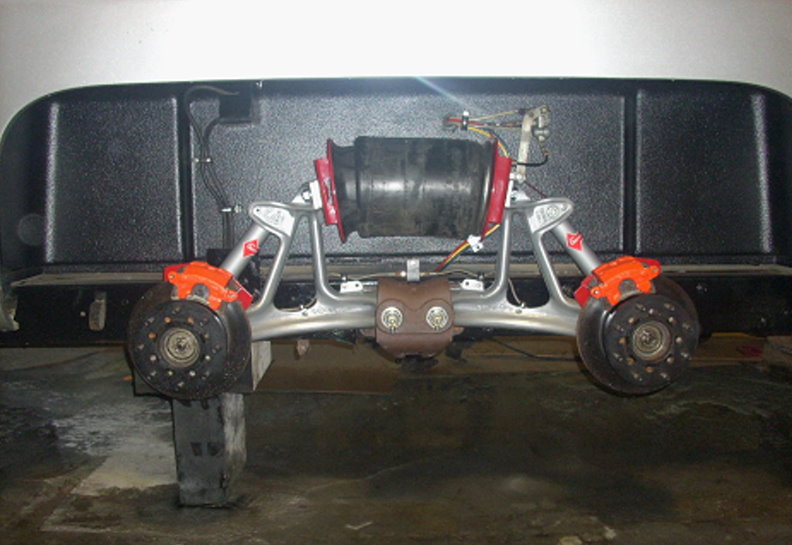
The air spring suspension system on the GMC motor home produced from 1973-1978 has functioned well in its original design for decades. Many coaches are still supported by the original Firestone air springs. The original air spring design performs all of the leveling and weight support for the coach while driving down the road or adjusting the coach to a level condition while parked for camping. New replacement air springs were available through various distribution channels until recently when Firestone halted production of the original part # and have failed to offer a direct replacement to take its place. There have been many unique designs offered to replace the original GMC air spring system. These different systems vary in complexity, price, ease of installation, as well as similarity to the original system function. The Sullybilt air bag mounting system is the least expensive replacement option available that retains factory like ride height adjustability. It is also the simplest and easiest to install.
The Sullybilt air bag mounting system is a refinement of a concept published by Mark Grueninger of Valmeyer Illinois. In the course of his business Mark had access to a number of different air springs and started doing research and tinkering. The original Markbag was the result. In building my own set I made a few discoveries of my own which led to several changes in design and construction techniques implemented for manufacturing. The Sullybilt air spring system is the result. The main changes made prior to production were;
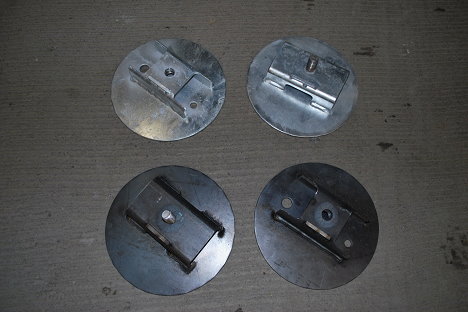
- The diameter of the mounting plate standoff was increased to enlarge the mating surface between the bracket and the bogie arm.
- The standoff was redesigned with a welded nut for mounting to the bogie arm rather than a bolt to allow for more flexibility with various air supply line configurations such as manual fill/shut off valves.
- The standoff was redesigned to allow the fill port to be housed within the standoff to relocate the inlet line and plumbing from the direct debris field of the tire and resolve interference between the air line and the tire when the air spring is in the fully deflated condition.
- The diameter of the backing plates was increased to add more protection to the air spring in the event of a tire blowout.
Installation of the Sullybilt air spring system is slightly more complicated than changing a tire but easier as the components are lighter.
- Move the vehicle to firm level ground and inflate existing air spring until two 4X4s and a 2x4 will fit under the bogie. If existing air spring is non functional due to rupture, lift rear of coach in an area as close to the bogie mount bracket as possible where the frame is double thickness.
- With blocking inserted, deflate air bag until coach is resting on blocking.
- Remove air line and brass adapter fitting from existing air spring fill port
- Loosen one side of the oem air spring and then tighten it snug. Loosen the opposing side mount and remove nut and star lock washer(s). Keep one nut and washer aside as it will be used in assembly of new air spring. Remove the first nut which was tightened snug and remove the air spring.
- Thread one of the supplied half inch nuts onto stud on the composite cone end of the bag which only has one mounting stud. With a hack saw or abrasive cut off tool remove ½” of f of the exposed end of the threaded stud above the nut
- File the cut stud to remove any sharp burrs which could make the nut hard to start or cut your finger and remove the nut. Thread the nut back onto the stud to ensure the nut starts easily.
-
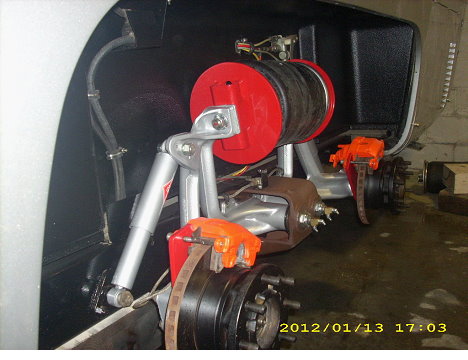
Assemble the two plates onto the ends of the bag. Remove the rubber fill port and mount stud protectors. The plate on the fill port side can only be assembled one way with the fill port exiting out of the plate at the tall side of the angled standoff. Use the second supplied ½” flanged nut to secure the solid mount stud on the fill port end and one of the OEM air spring nuts and star washers to secure the fill port side. Tighten the fill port and adjacent stud completely but leave the stud on the cone end loose for final tightening later in assembly.
- Compress the Sullybilt air spring assembly to relieve as much air as possible and replace the fill port cap before releasing the compression on the air spring. This will hold the spring in the collapsed position for easier installation. Insert the bolt end of the assembly into the bogie arm away from air line. Install the ¾” washer then the ¾” nut onto bracket stud until nut begins to make contact with bogie arm.
- Remove fill port cap until air spring and bracket extend and touch the bogie arm then re install cap. Thread bolt and washers through bogie mount and into threaded bracket. START THE BOLT BY HAND. Once started, tighten the bogie bolt until snug.
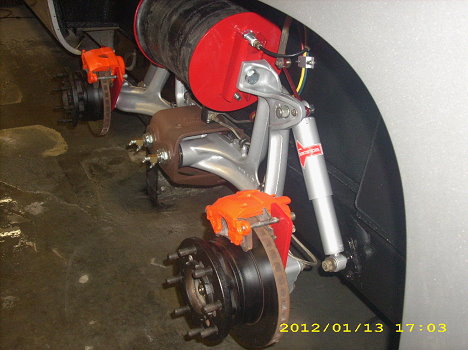
- Align the standoff on the fill port side to the outboard edge of the bogie arm so that the wall of the standoff is parallel with the outboard edge of the air spring mounting flange on the bogie and tighten.
- Align opposite side of air spring assembly in the same manner as the fill side and tighten. When you are finished, both mounting standoffs should be parallel with the bogie arm outer most edge or the tops of the standoff in the 12 o’clock position and the shorter end of the standoff in the 6 o’clock position.
- Using the openings in the side of the standoff, tighten the solo mount stud on the opposite side from the fill port. Take care to center the air spring cone on the plate as you do so.
- Install fresh Teflon pipe thread tape sealant to brass air line adapter and thread adapter into fill port and tighten. Install air line and air up the system to lift coach off of blocking. Once enough air is pumped into the new bag to lift the coach off of the blocking, stop filling and check air line connections with soapy water for leaks.
- After test drive, visually inspect for alignment of plate standoffs and any bolt you may have forgotten to tighten.
Installation of the second spring kit will go faster than the first.
Watch the Installation Video.
PRICING
Sullybilt air spring bracket kits are available individually or as a complete set. A complete set will do both air springs. Individual spring kits can be installed on only one spring but I recommend replacing both air springs for an even, consistent ride and keeping one functional OEM spring on board the coach as an emergency spare. Individual bracket kits come with all needed hardware to install with the exception of one of the original air spring nuts and washers which are retained from the removed OEM spring.
Bare steel brackets $225 per side or $400 for a complete set.
Hot dip galvanized steel brackets $225 per side or $425 for a complete set.
Stainless kits firm pricing to be quoted at time of order due to the fluctuation in stainless pricing.
Shipping is $22.50 per side or $50 per complete set.
Powder coated brackets. With the massive variety of powder colors/textures and manufacturers I am reluctant to offer a multiple of color choices. I can have them powder coated black if a complete set is ordered and the cost will be $125. If you want powder coat and want to pick a custom finish I recommend purchasing the bare steel brackets and taking them to a powder coater of your choice near you so you can pick the color at the facility. I think that you will find that you can have a complete set done in the color of your choice for less than I have quoted here for black.
Above pricing does not include the air spring itself. The air spring is a Firestone manufactured air spring part # W01-358-9294. There are other cross referenced springs available. A cross reference sheet as well as a spec sheet on the Firestone air spring is available on the Firestone corporate web site and included with each side set of Sullybilt air spring brackets.
Available on the web from ~$118 each, here is a web search for the required air bags:
www.google.com/search?q=W01-358-9294
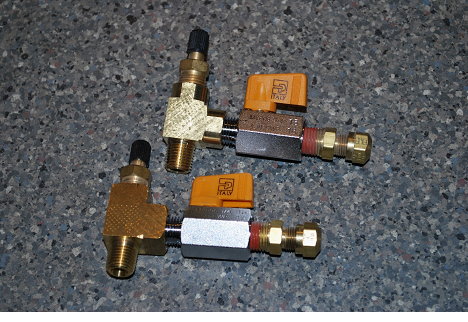
Shut off/Schrader Valves
$85 for a complete set – we recommend to allow remote inflation and deflation of the airbags while also allowing isolation of each airbag from the motorhome air compressor system.
TESTIMONIALS
11/10/2014
I also have these new bags. Only took less than an hour by myself to install. Had them for about 1 year. I am very happy with them.
Gary Mills
1974 Tangerine Dream
11/9/2014
Had them for nearly a year. First one took about half an hour to install, 2nd one about 10 minutes. No noticeable difference in ride from original.
Firestone bags have an internal bump stop, so even if you blow a bag somehow you can limp down the road. If you keep an eye on the SD Truck Springs
website, you can get 20% off and free shipping, which brings the price of a new bag to about $115 delivered.
No doubt in my mind, for price and performance, Sully can't be beat. You can get the Sully hardware for both sides and 3 (2 and a spare) new Firestone
airbags for less than the cost of two NOS stock bags.
David Orders
1976 Royale "Twinkie II"
4/10/2014
I have had the Sullybilt system for about a year and have only driven about 2000 miles since installation. I purchased it with a lot of apprehension. I was torn between the Quad bag and Sullybilt. I spoke with Todd on the phone a couple of times and with some reassurance I finally decided to go with his system based on the price difference. Seldom does going with the lower priced item turn out well for the purchaser. I am happy to report that this product does not follow that rule. I have been incredibly happy with this system. It runs at much lower pressures, rides and handles great and it takes some of the harshness out of hitting potholes(which we have a lot of in South Dakota). This is not a comparison or an insult to any other aftermarket system it is just my experience, for what its worth.
--
Bob Schilling
'78 Royale
12/14/2011
I was able to find a volunteer to try the new bag bracket set up at the GMC rally in Ferndale a couple of weeks ago. The weather was cold and drizzling not to mention getting dark by the time we gathered a small group to watch the install. We decided to install one bag for a side to side ride comparison. After a few minutes on soft uneven ground the new bag was on and the system aired back up. Minutes later we were out tearing up the neighborhood and turning corners both directions at speed. There was the coach owner and driver at the wheel, myself and two other curious GMC owners in the coach. The observations were
1. The ride appeared to all of us to be firm but plush and very similar to the OE.
2. There appeared to be less body roll or lean when turning away from (loading) the new bag design than the oem. The new bag system was installed on the right. Left turns which load the right bag resulted in less body roll or sway than right turns which load the left oem bag set up.
3. There should be less sway or lean with both bags installed than currently exhibited by the stock system
4. No additional parts were required as the existing air lines and brass adapter swapped over without incident. No jacking was necessary to instal the bag even on soft uneven out of level ground.
5. The owner and driver of the test coach said he loved the feel and thought it felt better than the oem set up.
6. The owner and driver of the coach is the first order placed and will have his stainless set next week.
Sully
Aug 15, 2012
Wanted to take a moment to praise Todd Sullivan and the Sullybuilt airspring brackets. Ordered the first set which sat too close to the wheelwell. Spoke to Todd and long story short, he developed a second "offset design" which fits perfectly. I guess all GMC rear wheelwells are not equally placed, likely common on a mostly hand built vehicle.
Sent the new ones out and I sent the first set back. Installation is so easy, takes longer too jack it up and take off the wheels.
Got them on a few weeks ago and took a long test drive. Wow! What a difference. I was puzzled why after a complete rebuild of my front steering and suspension, it still did not drive right. Well it does now. Never thought upgrades to the back would help the front so much. Drives with one finger now. Less roll on a turn.
Am 100% satisfied. Even sold off my used OEM bags to buy an extra firestone airspring to keep for a spare.
Excellent product with excellent service. Thanks again
R.D.Hart
77 ex palm Beach 403
Available Air Spring replacement systems for the GMC Motorhome
Mark Grueninger's original design